
How to Take Progress Photos: Same Angle, Lighting & Pose Every Time
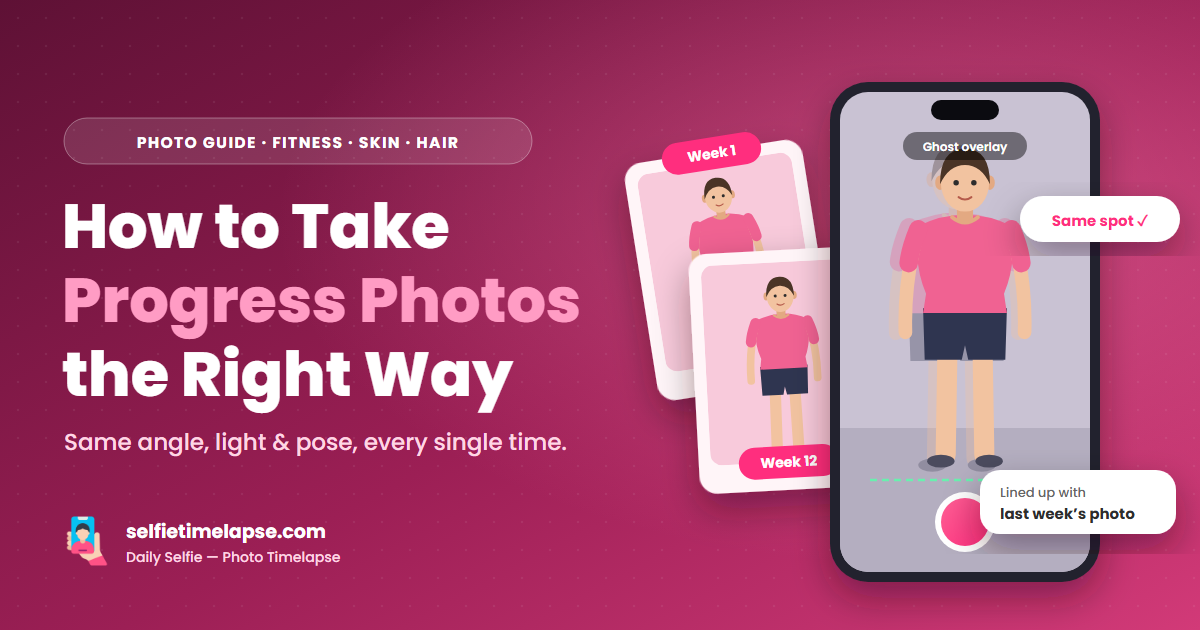
Progress photos are only useful when you can compare them fairly. Raise your camera a few inches, stand a step closer, or swap soft window light for a bright ceiling bulb, and a real transformation can suddenly look bigger or smaller than it actually is.
The fix isn't a better camera. It's consistency. In this guide you'll learn how to take progress photos with the same angle, distance, lighting, framing and pose every time. We'll cover simple setups for face photos and full-body photos, how often to shoot, how to rescue the inconsistent photos you've already taken, and how to turn a finished series into a before-and-after or a timelapse video.
Whether you're documenting fitness, weight loss, hair growth, skincare, braces, a pregnancy or a 365-day project, the rule is the same: control the camera so the only thing that changes is you, not the photo.
Key takeaways
- Five variables decide whether two photos are comparable: camera height, distance, lens/zoom, light, and pose (plus clothing and background).
- Pick one permanent spot and mark it: tape on the floor for your feet and the tripod, and the same window light at the same time of day.
- Chest-height camera, 2–3 meters away is a reliable default for full-body photos; for face photos, arm's length or more, eyes level with the lens.
- Weekly is the best default for body transformations; daily suits face, hair and skin projects; monthly suits long, slow journeys.
- Match the previous shot, not your memory of it. A grid or a faded "ghost" of your last photo removes most of the drift before it happens.
Why consistent progress photos matter
A progress photo has one job: to show real change. The problem is that a camera can create change on its own. A phone held at hip height makes legs look longer and the midsection bigger. A phone held above your head makes your body look leaner and your head bigger. A ceiling light carves shadows that look like muscle definition; a window behind you hides detail entirely.
None of that is progress. It's photographic variation, and it can hide weeks of real work or invent results that aren't there. That's why so many people look at their week 1 and week 8 photos and feel nothing: the two pictures were never comparable to begin with.
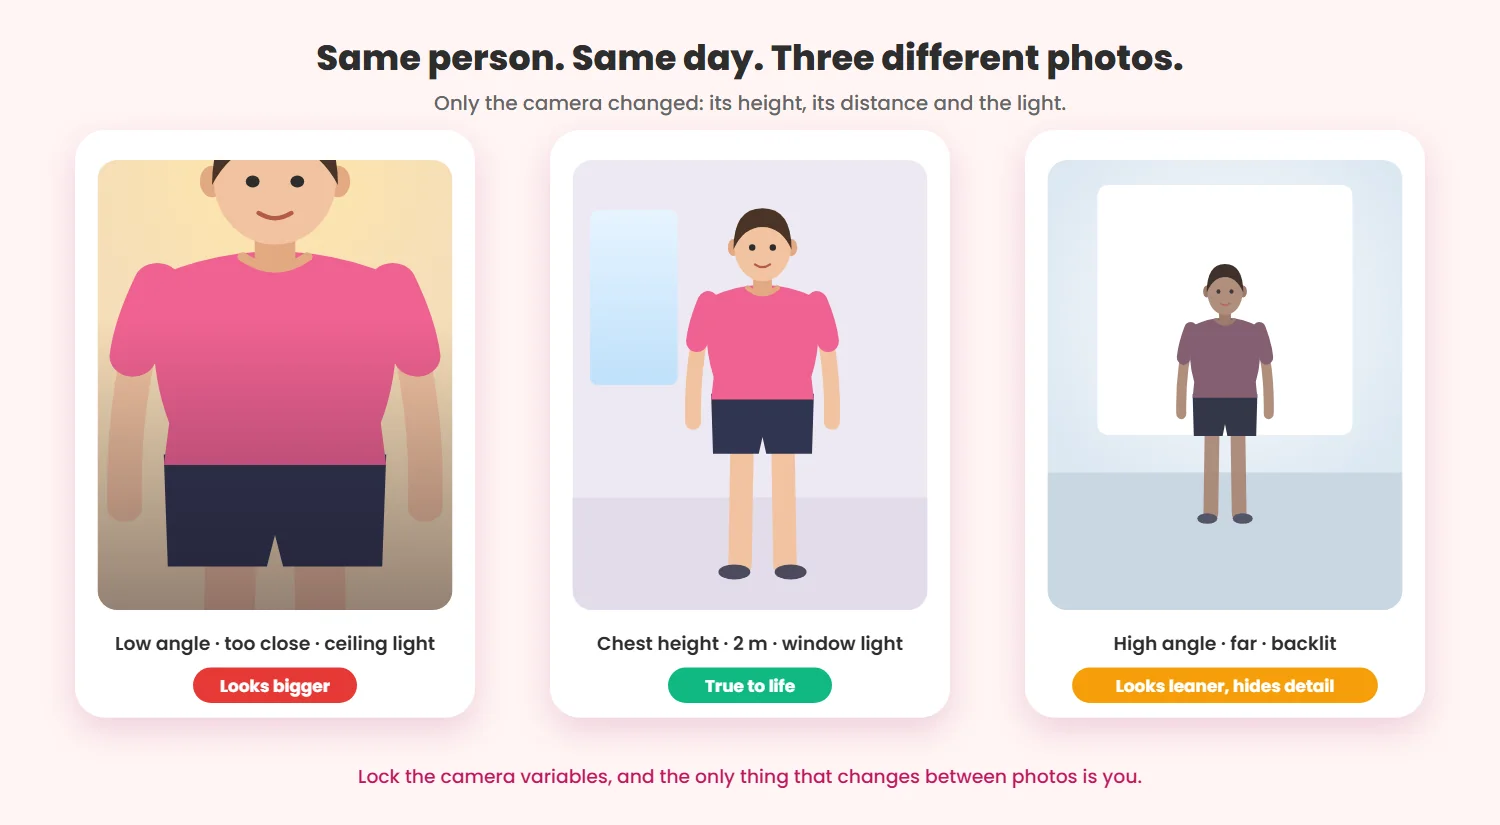
The good news: every one of these variables is under your control, and once you've set up your spot, keeping them the same takes no extra time.
The 5 variables you need to keep the same
Think of your progress photos as a science experiment. You are the only thing that should change. Everything else, the "camera variables", stays locked.
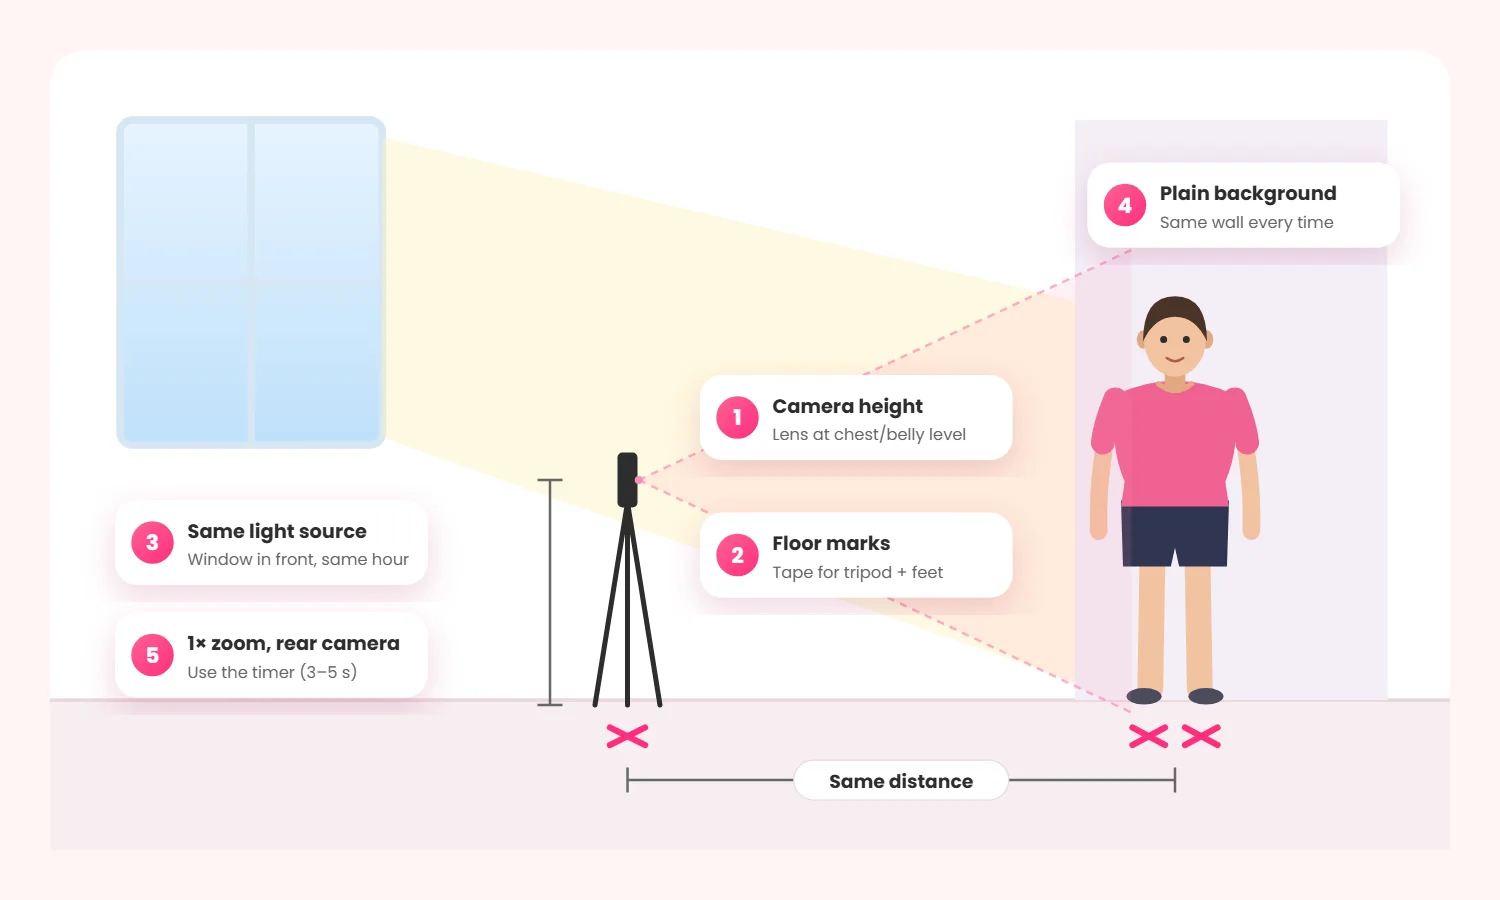
1. Camera height and angle
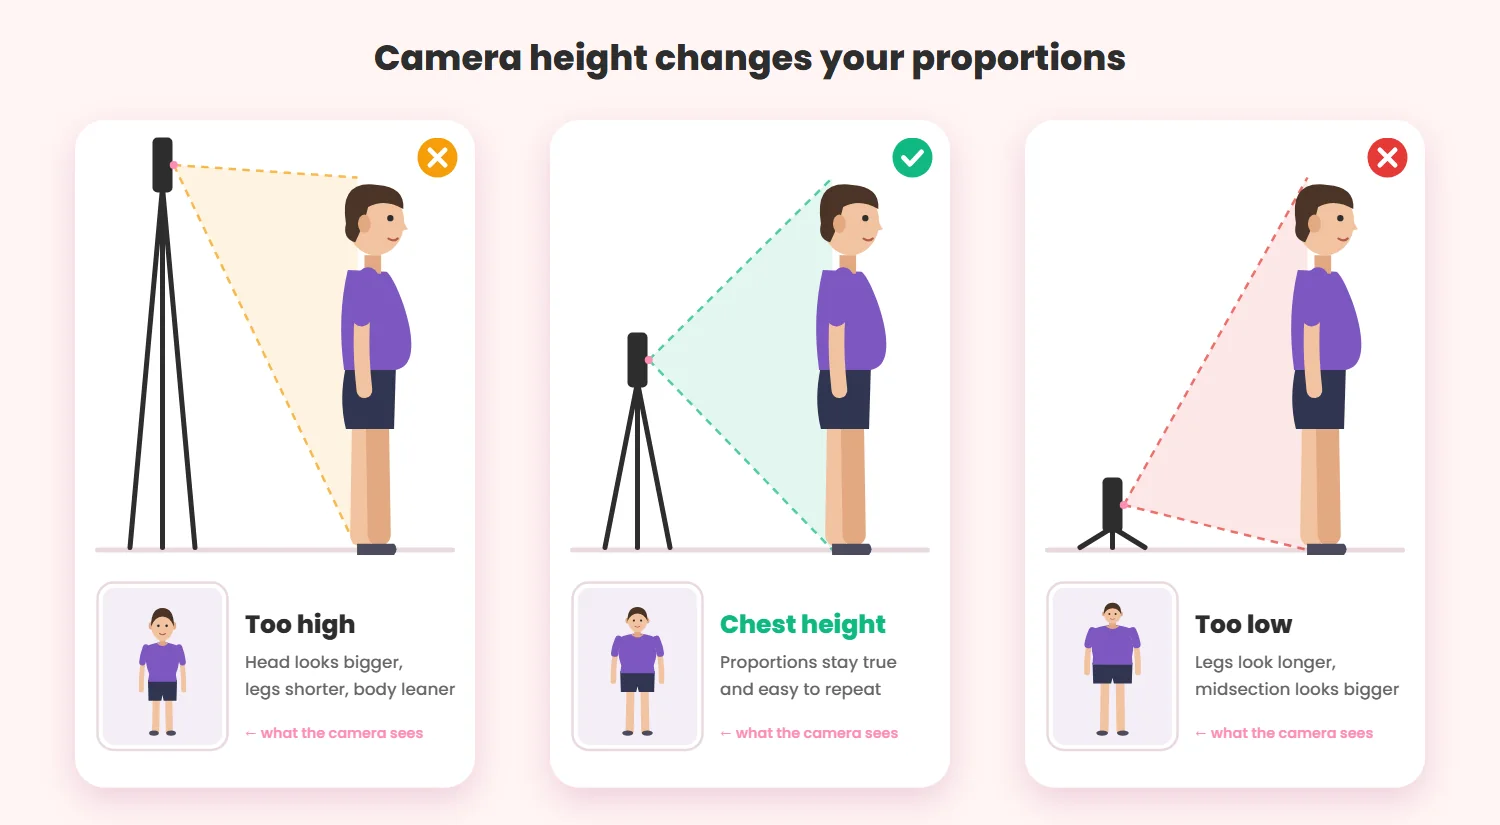
Camera height is the variable that distorts body proportions the most. When the lens is above you and pointing down, your head and shoulders get bigger and your legs shrink. When it's near the floor pointing up, your legs stretch and your midsection grows.
To take progress photos at the same angle every time, put the lens at chest to belly-button height for full-body shots, and keep the phone perfectly vertical (not tilted up or down). For face photos, put the lens at eye level. A cheap tripod makes this automatic; if you don't have one, use a shelf or stack of books and mark where the phone stands.
2. Camera-to-subject distance
How far away should you stand for progress photos? Far enough that the camera sees all of what you're tracking with a little margin, and then exactly that far every time. For a full-body shot with a phone's main camera, that's usually about 2 to 3 meters (6 to 10 feet). Put a strip of tape on the floor where your toes go and another where the tripod stands.
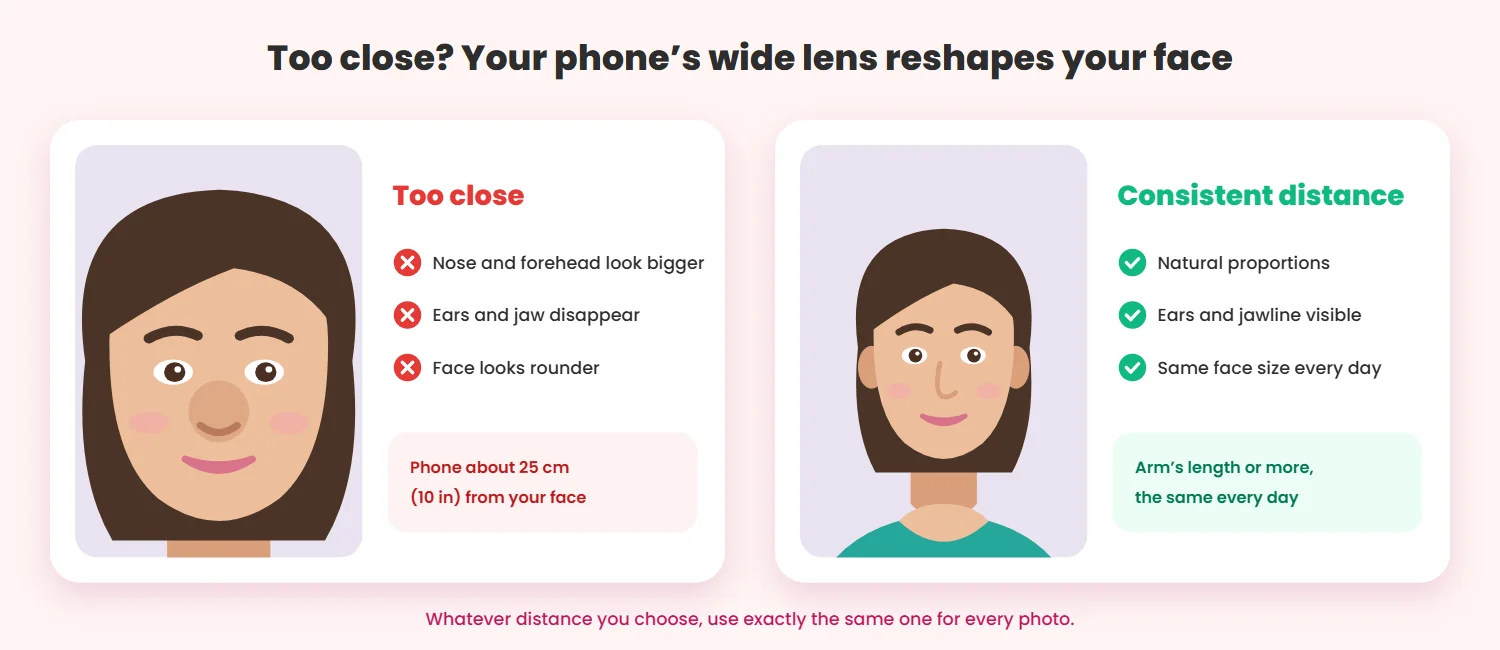
Distance matters even more for faces. Phone lenses are wide-angle, so when the phone is close to your face, whatever is nearest the lens (your nose and forehead) gets exaggerated, while your ears and jaw fall away. Shoot from arm's length or further, and keep it the same.
3. Lens and zoom level
Most phones now have two or three lenses (0.5×, 1×, 2× or more), and they switch automatically in some modes. Each one renders your body differently. Always use the same camera (front or rear), the same lens and the same zoom. If you use the rear camera for better quality, turn on the self-timer so you can step into position. Apple's guide to iPhone camera tools shows how to turn on the timer, grid and level; most Android camera apps have the same options.
4. Lighting and time of day
Light is the variable people forget. An overhead ceiling light casts deep shadows under the eyes, chest and stomach, which exaggerates muscle definition one week and hides it the next. A window behind you turns you into a silhouette. Mixing warm bulbs with cool daylight shifts skin tone from photo to photo.
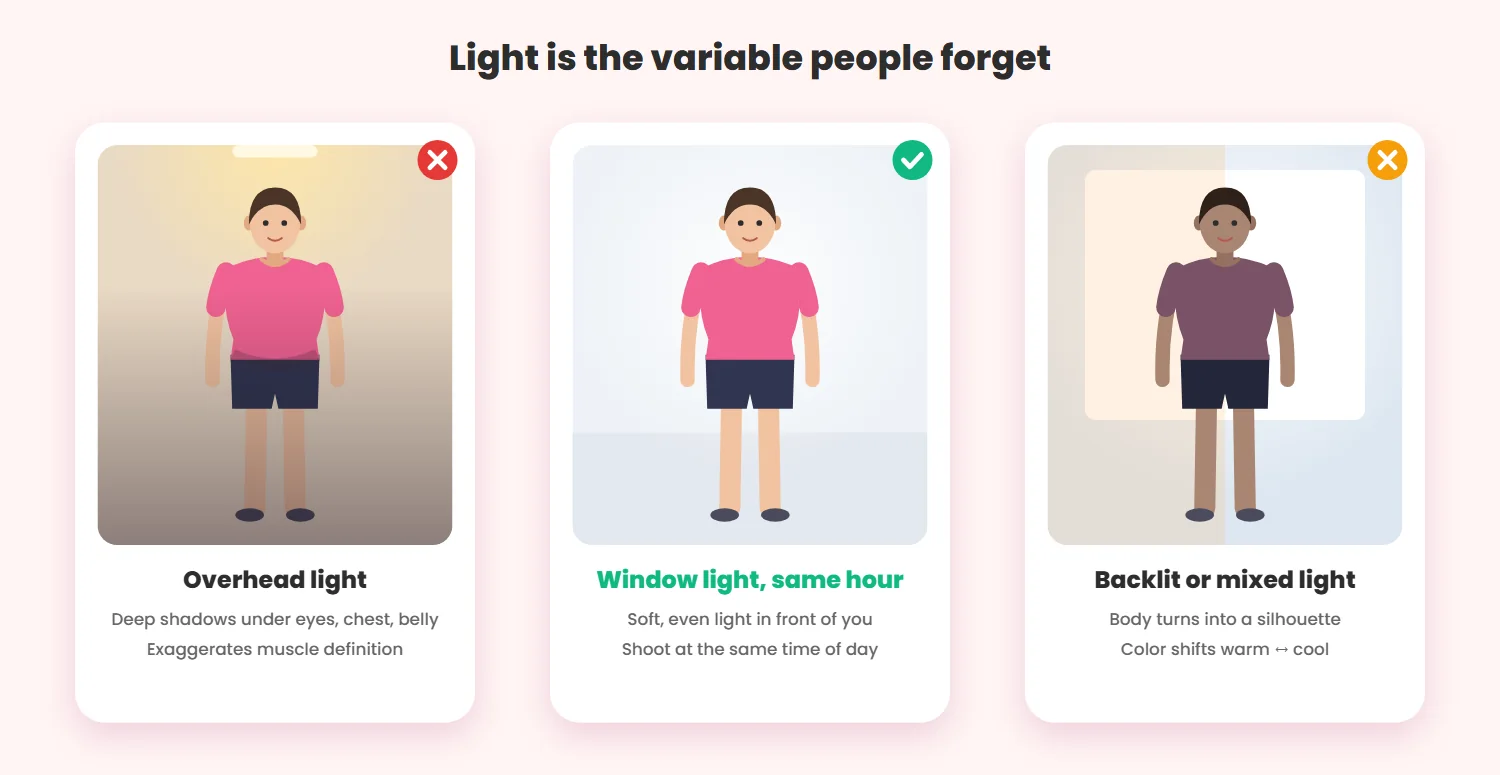
The best lighting for progress photos is soft, indirect daylight from a window in front of you (behind the camera), at the same time of day. If your schedule means you shoot at night, pick one lamp, put it in the same place every time, and turn off everything else. For body photos, many people shoot first thing in the morning, before eating, because it gives the most repeatable conditions.
5. Background, clothing and pose
Use the same plain wall, the same outfit (or the same type of outfit, with the waistband at the same height) and the same pose. Changing your shorts from high-rise to low-rise changes how your waist reads in a photo. Keep your hair off your face for face and skin photos, and keep your expression neutral. A smile moves your cheeks and eyes and makes faces harder to compare.
How often should you take progress photos?
There's no single right answer. The best frequency is the one you'll actually keep, and the one that matches how fast your change is visible.
Daily photos
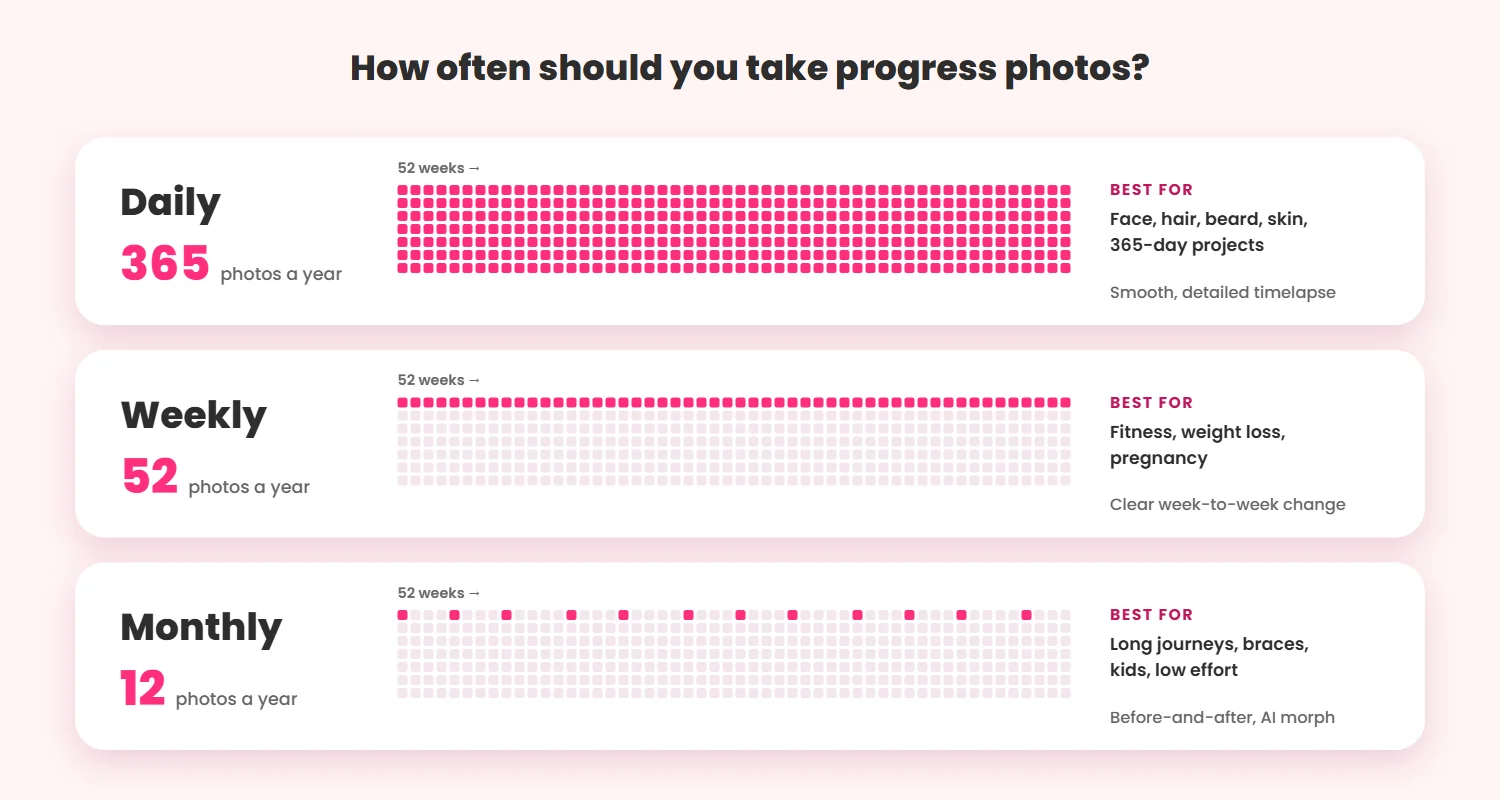
Best for face, hair, beard and skin projects, and for anyone who wants a smooth timelapse at the end. Daily change is invisible, but 365 frames make a fluid video. The trade-off is effort: you need a routine you can repeat in under a minute.
Weekly photos
The best default for fitness, weight loss and pregnancy. Day-to-day body weight and water retention fluctuate, so daily body photos can be noisy and discouraging. Once a week (same day, same time) gives you clear, comparable steps.
Monthly photos
Good for long, slow journeys (braces, a child growing up, a year-long hair project) or if you just want a low-effort record. Twelve photos a year still make a strong before-and-after.
| Frequency | Photos / year | Best for | Watch out for |
|---|---|---|---|
| Daily | 365 | Face, hair, beard, skin, 365-day projects | Habit fatigue; needs a 1-minute routine |
| Weekly | 52 | Fitness, weight loss, body transformation, pregnancy | Shoot on the same day and time each week |
| Monthly | 12 | Braces, kids, long journeys, low effort | Easy to forget; set a reminder |
Whatever you choose, don't judge progress photo by photo. Compare week 1 with week 8, or month 1 with month 6. Big gaps show real change; neighbouring photos mostly show noise.
The best setup for each type of progress photo
Face, hair, skincare and braces
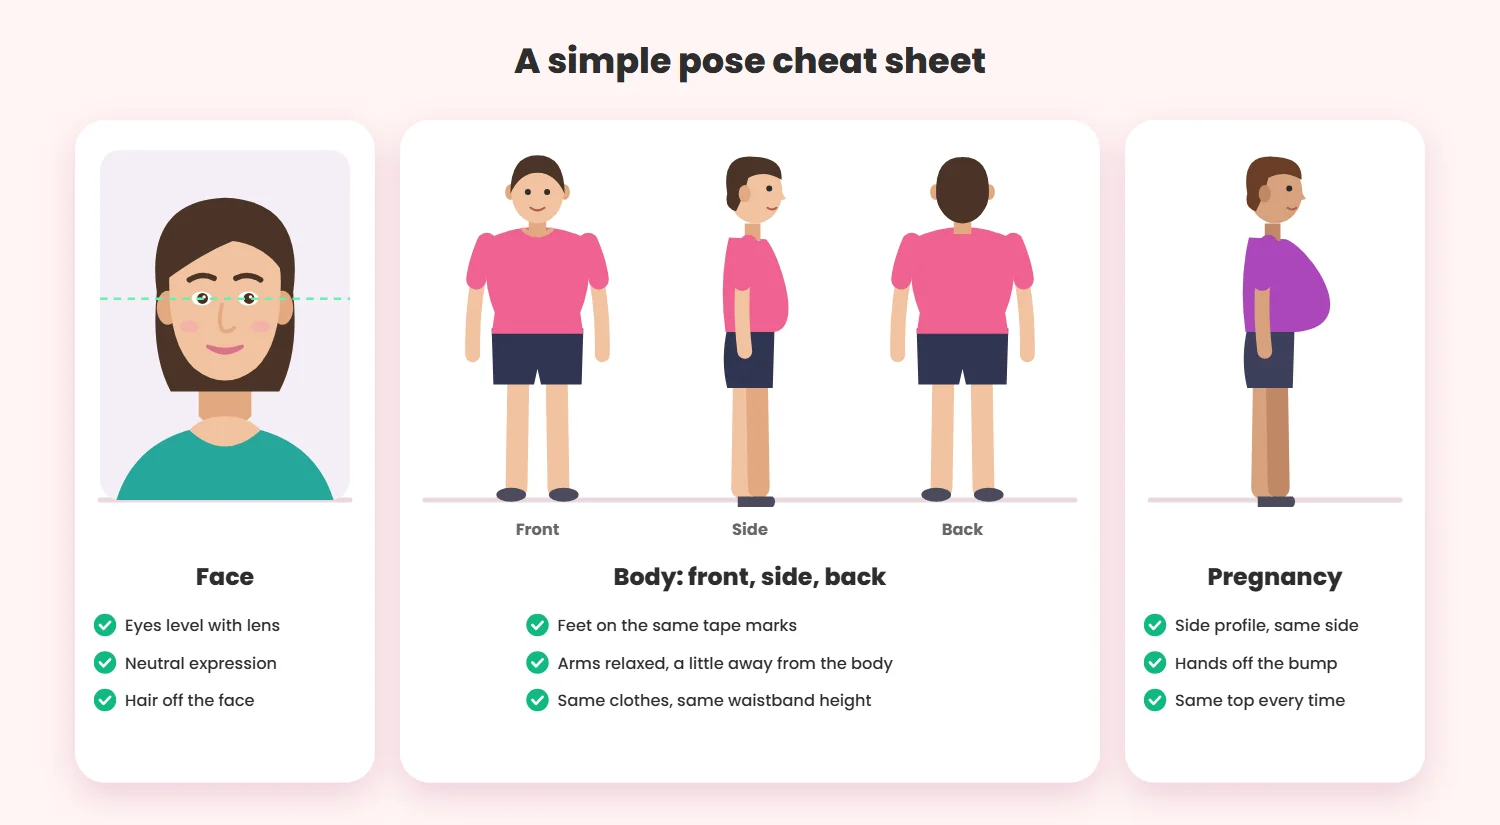
Prioritize the eye line, face orientation and light. Look straight into the lens with your eyes level, chin neutral (not up or down), hair pulled back if you're tracking skin. For skincare progress, light is everything: use the same window and avoid filters that smooth skin. To track hair growth, add a top-down or hairline shot from the same height. For braces progress photos, take one relaxed and one full smile, always in that order.
Fitness, weight loss and body transformation
Prioritize camera height, distance, posture and full-body framing. Take three photos every time: front, side and back. Stand on your tape marks, feet hip-width apart, arms relaxed and slightly away from your body so your waist is visible. Should you flex? If you want to, take one relaxed and one flexed set, and always do both. For weight-loss progress photos and fitness transformations, the relaxed set is usually the more honest comparison.
Pregnancy progress photos
Prioritize a consistent side profile, always facing the same direction, with the camera at bump height and the same backdrop. Keep your hands off the bump (or always in the same place) and wear the same fitted top. Weekly works well; see our pregnancy bump journey guide for ideas.
A repeatable progress-photo workflow
Good setup only helps if it's easy to repeat. Here's a four-step routine that takes about a minute once it's set up. You can do it with any camera; we'll show how the progress-photo tools in Daily Selfie handle each step.
Pick one permanent shooting position
Choose the spot once, then never improvise. Tape marks on the floor for your feet and the tripod, the same wall behind you, the same window in front. If you travel, take the photo anyway, but treat it as a bonus rather than part of the comparison series.
Use a grid or a ghost image to match the last photo
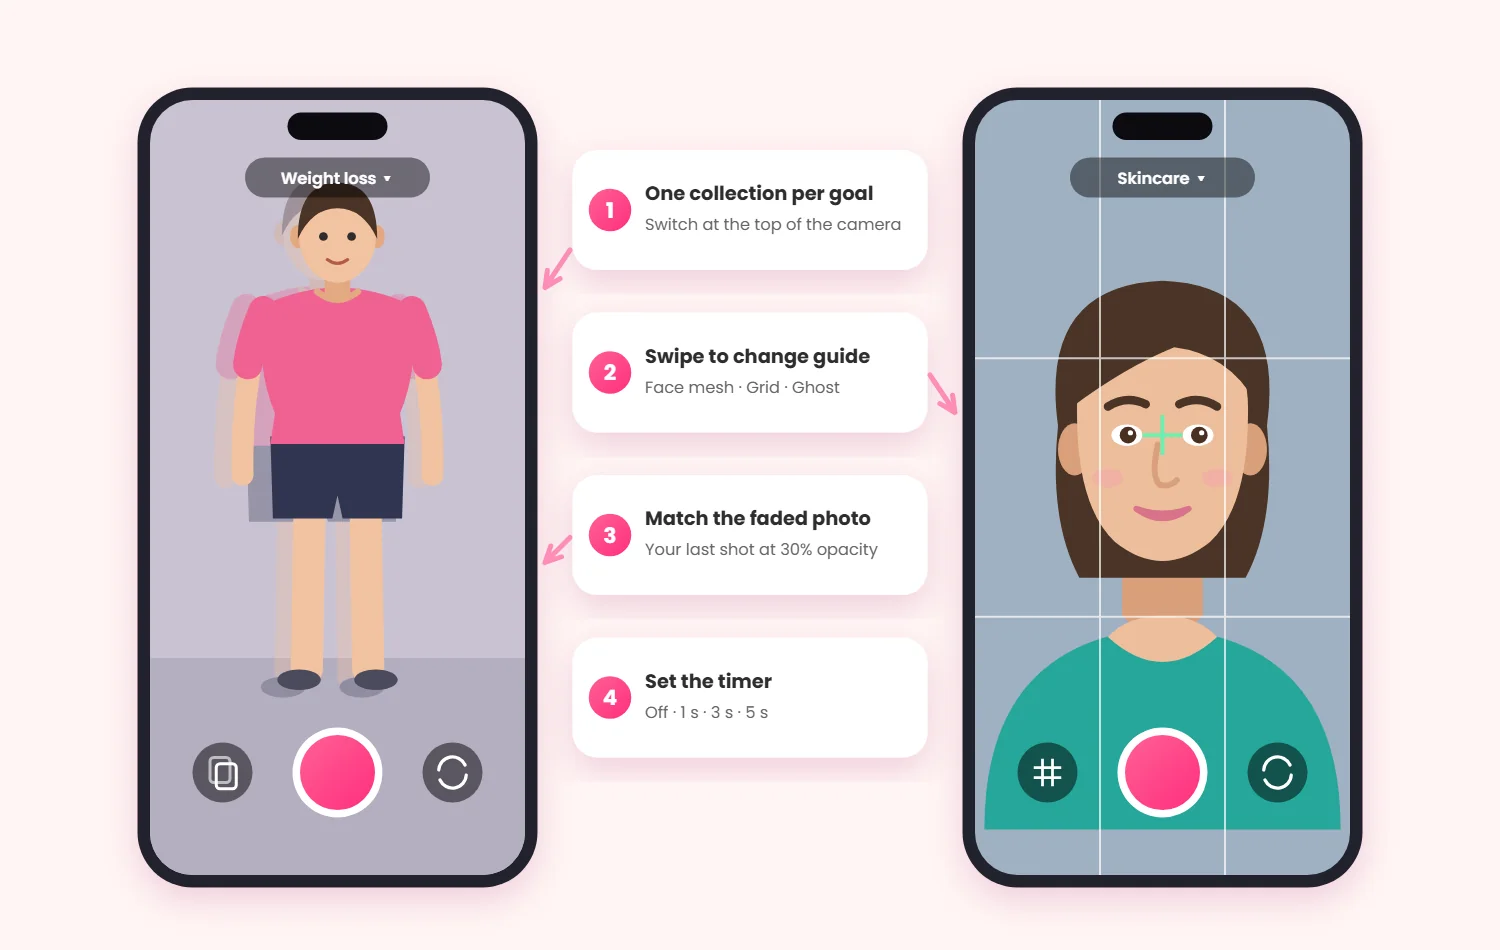
Memory is a terrible reference. Instead, line up against something on screen. A grid helps you keep your eyes, chin or shoulders on the same lines. Even better is a ghost overlay: your previous photo shown faded on top of the live camera, so you can step into exactly the same outline.
The Daily Selfie camera has three guides that you switch between by swiping across the preview: a face guide you can drag and pinch to size, a grid, and a ghost overlay that shows the latest photo from the same collection at 30% opacity. The ghost works for full-body shots too. The camera also has a 1, 3 or 5-second timer, and it always opens at the same zoom level, so you can't drift between lenses by accident.
Save each journey in a separate collection
If you're tracking your body and your skin at the same time, don't mix them in one camera roll. Keep one album per goal. In Daily Selfie, each journey lives in its own collection, and you pick the collection at the top of the camera, so the ghost overlay always shows the right previous photo.
Set a reminder you can actually maintain
Attach the photo to something you already do: right after your morning shower, or every Sunday before breakfast. Then set a reminder for that exact time. Daily Selfie's daily reminders let you choose the time and the days (every day, weekdays, weekends or specific days like Sunday only), and the home screen tracks your current and best streak.
Want the full picture first? See how the daily capture workflow works, from the first photo to the finished video.
How to fix progress photos you already took
Already have months of inconsistent photos in your camera roll? Don't delete them and don't start over. You can rescue most of them.
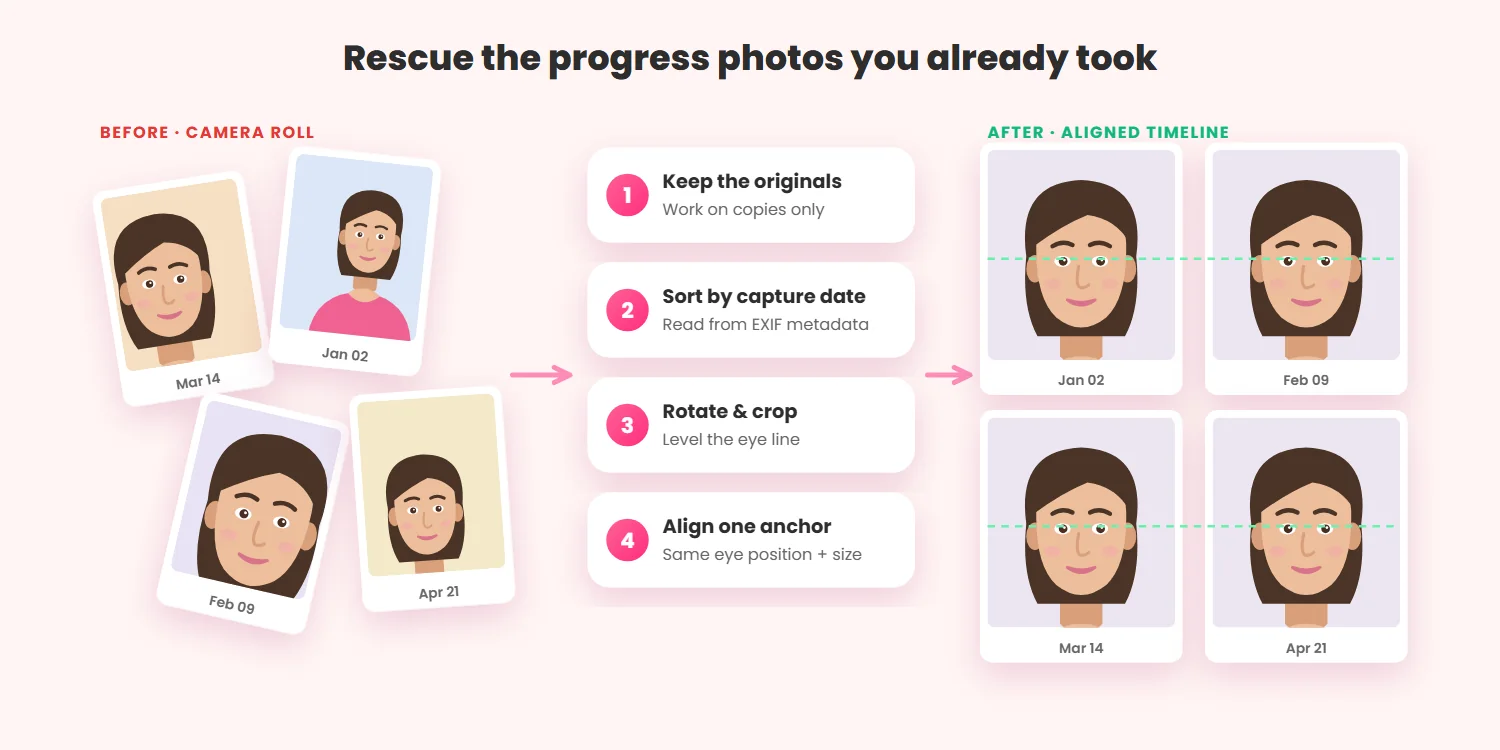
Keep the original files
Before you edit anything, make sure the originals are backed up, for example with Google Photos backup or iCloud. Work on copies. Cropping is permanent, and you may want a different framing later.
Sort the images chronologically
Your phone stores the original capture date inside each photo (in its EXIF metadata), even if the file was renamed or sent through a chat app that kept the metadata. Sort by that date, not by file name or download date.
Correct rotation and crop
Rotate each photo so the eye line (or shoulder line) is level, then crop them all to the same aspect ratio with your subject in the same place.
Align one stable anchor point
Pick one anchor and match it across every photo: the pupils for faces, the top of the head and the feet for full-body shots. Scale each photo so that anchor is the same size and in the same position. This is exactly what automated tools do: the open-source Immich selfie timelapse project, for example, aligns faces by eye position and filters out blurry, dark or non-front-facing photos.
Import historical photos rather than restarting
Daily Selfie can batch-import photos from your gallery. It reads each photo's original capture date from the EXIF data, lets you correct any date before importing, and places every photo on the right day of your timeline. Imported photos are cropped to the app's vertical 9:16 format, so photos with you near the center work best. For face photos, the Align faces option in the Simple video then lines up your eyes automatically when you export.
Turn your progress photos into a before-and-after or timelapse
Once you have a consistent series, there are three common ways to show it:
- Before-and-after: two photos side by side, usually the first and the latest. Simple, powerful, and only honest if both were taken with the same setup.
- Hard-cut timelapse: every photo shown for a split second. Great for weekly and daily series. Daily Selfie's Simple video works this way, with optional face alignment, date overlays and music synced to the beat.
- AI face morph: instead of cutting, each photo warps smoothly into the next. It's designed for faces and works best on a selection of photos, such as one per week or month. See how to create a smooth face-morph video.
A plain crossfade between photos is a fourth option in most video editors, but it tends to show two overlapping faces or bodies mid-transition. Going for a full year of daily photos? Read how to turn a full year of photos into a smooth timelapse. Still choosing an app? Compare photo-a-day apps.
Progress photo privacy and backup checklist
Progress photos are some of the most personal pictures you'll ever take. Before you start a months-long series, decide where they'll live.
- Know where your photos are stored. Some apps keep photos only on your phone (lose the phone, lose the project); others back them up to an account. Daily Selfie uses an account: photos are uploaded to your Daily Selfie account, so they're still there if you switch or lose your phone, and videos are created online.
- Lock the app. If others use your phone, choose an app with a lock. Daily Selfie can require Face ID, a fingerprint or your device PIN, and hides its preview in the app switcher.
- Keep a second copy of anything irreplaceable. Save your favourite photos and finished videos to your phone's gallery from time to time.
- Know how to delete everything. In Daily Selfie, deleting your account permanently removes all photos and videos. Read the privacy policy for the details.
- Be careful what you share. Share the video or the before-and-after, not the whole album.
Frequently asked questions
What is the best angle for progress photos?
Straight on, with the camera at chest to belly-button height for full-body photos and at eye level for face photos, and the phone held perfectly vertical. Take front, side and back views for body photos. Whatever angle you choose, the most important thing is to repeat it exactly.
Should I take progress photos every day or every week?
For fitness and weight loss, weekly is the best default because daily fluctuations in water and bloating make daily photos noisy. For face, hair, beard and skin projects, or if you want a smooth timelapse, daily works well. Monthly is fine for slow, long journeys.
What time of day should I take progress pictures?
The same time every time. Many people prefer the morning, before eating, in natural window light, because it's the most repeatable condition. If you shoot at night, use the same single lamp in the same position.
Should I flex in fitness progress photos?
You can, but be consistent. The most useful approach is a relaxed set (front, side, back) every time, with an optional flexed set taken in the same order. Compare relaxed with relaxed and flexed with flexed.
How do I take progress pictures from exactly the same spot?
Put tape marks on the floor for your feet and the tripod, keep the phone at the same height, and use a timer. Then line up against your previous photo using a grid or a ghost overlay of the last shot.
Can I align progress photos I already took?
Yes. Keep the originals, sort them by capture date, rotate and crop them to the same framing, and align one anchor point such as the pupils. An app with batch import and automatic face alignment can do the face-alignment part for you.
What app can keep progress pictures aligned?
Look for an app with a ghost overlay of your previous photo, separate collections for each goal, reminders, and automatic face alignment when exporting. Daily Selfie has all four and is free to start on iOS and Android. Our roundup of photo-a-day apps compares the alternatives.
How do I turn progress photos into a video?
Import or capture your photos in order, then export them as a timelapse (each photo shown briefly), or as an AI face-morph video where each face blends into the next. For face photos, turn on face alignment so the eyes stay in the same place.
Looking for more ideas on what to track? Browse other progress-photo ideas, from glow-up transformations to hair, skin and fitness journeys.
Make every progress photo comparable
Line up each shot with a ghost of your last photo, keep every goal in its own collection, and turn the series into a timelapse in a few taps. It's free to start.
Download Daily Selfie Free